Today I got my Laptop's RAM upgraded to 1GB. Now I can try researching more on virtualization specially full virtualization using KVM (Kernel Virtual Machine). And yeah now I can run more app's simultaneously in my Redhat5. I am almost finished writing my next article on how to configure Redhat Enterprise5 to use full virtualization provided by KVM (Kernel Virtual Machine).
This article helped me learn how I can build my own rpm's using the source rpm's provided by Redhat. That was really nice. I got my whole virtualization stuff in Redhat5 upgraded to the latest version.
And yeah I am working on my website too. Don't know when I will get satisfy with the design and stuff I am hosting.
Sunday, April 29, 2007

Friday, April 20, 2007
New Ubuntu

Hello everybody. Last night Ubuntu feisty fawn was released. I was eagerly waiting for this distro. And the major reason for that is I found only Ubuntu as a Linux distro which can be installed and configured according to user needs in very less time. Most of the linux distros are known for there hard software installation and configuration just after installing the base operating system. Detecting most of the commonly hardware is also a pain. But I kinda like it for past few years. But then also we need some distro that can help get us other windows users a reason to use linux. I prefer to install ubuntu on my friends systems (who never worked in linux before) and they all like it. With Beryl or Compiz with a Ubuntu installation you get a dream desktop which windows users (even vista) can only dream off. With feisty comes the desktop effects by default but it's based on compiz and Ubuntu warns the user who enable those effects that they will not support that software it's just there for technology preview. Well somewhat same thing was said by Redhat when they released almost the same thing with there Enterprise 5 product last month (Client). But then user have choice to install beryl on their Ubuntu and enjoy more effects (most of the nvidia/ati guys will go for it). But the sad part of the story is that beryl is going to be merged with compiz and now there will be no beryl anymore. There will be only compiz and what we see in beryl will be ported to compiz-extras. Well this merge is under process and that's the reason we don't see any changes in the beryl source svn these days. I heard from the beryl@irc.freenode.net that after the merge there will be no more svn they will host the source on git and beryl will move to compiz-extra. Well I am just waiting and watching the progress for the moment.
For the time being I have installed Feisty and enjoying it! I have also tried some server configuration on it (just like we have in Redhat). Most notable of them so far are Bind (DNS) and Apache (Httpd).
For the time being I have installed Feisty and enjoying it! I have also tried some server configuration on it (just like we have in Redhat). Most notable of them so far are Bind (DNS) and Apache (Httpd).
Sunday, April 01, 2007
Provisioning Linux Simplified with Cobbler
Well. RedHat Enterprise Linux 5 was release on 14th of last month. I hope alot of new changes will be there in it. But I still have RHEL5 Beta2 and this time I thought of trieing some new technology in my Beta2. I have heard alot of PXE(Pre-Execution Environment) but was never able to get time to try it. But recently I saw the RedHat Emerging Technologies webpage. This is a division in RedHat that is working on new technologies and one of them is Cobbler.
I studied about it and found that it is related to PXE in some way or the other but is more simplified and yet more powerful. So I thought to give it a try. Earlier I was not getting what I was doing but with a few posts at the mailing list of et-mgmt I got my self the way. So I am summarizing here what's the purpose of Cobbler.
If we left Cobbler for a moment and try to concentrate on Provisioning in Linux then what exactly does it means. It means how we can create and manage Linux machines. In simple terms we can install a lot of Linux machines (server or client) un-attendly (we need not be near the machine). We can have template based installation where we can specify a particular template to a given set of machines and another template to another set of machines and this way we can get all of them installed and running according to our configuration in very less time.
In earlier days (lol. still today) PXE installations were used to provision Linux machines so that we can get un-attended installations easily for a large number of machines. But RedHat is working on a technology called Cobbler that helps simplify PXE configuration and add to it alot of powerful features to mention some: Provisioning Xen Virtual Machines, Kickstart Templating and enchant.
I thought of trying Cobbler on my RedHat Beta2. Well to get started we need to install some dependencies. That are TFTP Server, DHCP Server, NFS Server, Portmap, HTTPD server and cheetah python template (required for Kickstart templating). All of the above packages can be found in the installation media of RedHat sources only required Cheetah can be downloaded from here. Once all of the dependencies are installed we proceed with installation of Cobbler. Cobbler can be downloaded from here. To install Cobbler just extract the tar you download and from the source directory give the command
python setup.py install. This will install it. After installing Cobbler we need to do some pre-configuration steps which are necessary before we start with Cobbler.First of all we need to enable TFTP Server. For that we need to edit
/etc/xinetd.d/tftp and change the disable=yes to disable=no and then service xinetd restart and chkconfig xinetd on.Second we need to configure our installation tree. I had dumped my whole Beta2 DVD in
/rhel5/Dump. And configure any one either HTTPD or NFS so that later we can access the Dump during installation. I preferred HTTPD as I faced problems with NFS earlier. To do so I edited the /etc/httpd/conf/httpd.conf file. In the last write this:
<VirtualHost "192.168.1.5:80"> ServerAdmin root@server.example.com
DocumentRoot /rhel5
<Directory "/rhel5"> Options Indexes Includes
</Directory> ServerName server.example.com
ErrorLog logs/server.example.com-error_log
CustomLog logs/server.example.com-access_log common
</VirtualHost>
We need not do anything we DHCP server configuration and PXE configuration as it will all be well taken care of by Cobbler. Now comes the crucial part of this configuration and that is creating a kickstart file to install clients. Creating a kickstart file is a very tricky thing. I prefer
system-config-kickstart tool for this job as it is GUI and easy to use. It can give us a sample kickstart file which we can edit according to our use. I did the same thing created the file via system-config-kickstart and edited it according to my client machine (I had one client only). I am posting my ks.cfg here:For Physical Machines:
install
url --url=http://192.168.1.5/Dump/
key 2515dd4e215225dd
lang en_US.UTF-8
keyboard us
xconfig --startxonboot
network --device eth0 --bootproto static --ip 192.168.1.23 --netmask 255.255.255.0 --gateway 192.168.1.1 --hostname server1.example.com
rootpw --iscrypted $1$QGYhCela$pNOZoWf4XoONvUdND/nS01
firewall --disabled
authconfig --enableshadow --enablemd5
selinux --disabled
timezone Asia/Calcutta
bootloader --location=mbr --driveorder=hda --append="rhgb quiet"
# The following is the partition information you requested
# Note that any partitions you deleted are not expressed
# here so unless you clear all partitions first, this is
# not guaranteed to work
#clearpart --linux
#part / --fstype ext3 --onpart sda3
#part swap --onpart sda6
#part /home --fstype ext3 --onpart sda7

%packages
@base
@base-x
@core
In the above kickstart I have commented the partition scheme as I wanted it done manually (don't wanted to loose my data). I save this file at
After we have configured all the required servers we should edit the file
/rhel5/Dump/ks.cfg.After we have configured all the required servers we should edit the file
/var/lib/cobbler/settings. In this file we edit the lines so that they look like this:
manage_dhcp: 1
next_server: '192.168.1.5'
server: '192.168.1.5'
manage_dhcp: 1 tells cobbler to take care of the /etc/dhcpd.conf for us. For this cobbler use a template /etc/cobbler/dhcp.template. The next_server and server points to my cobbler server system. They will be used in /etc/dhcpd.conf as next-server. As I have only one dhcp server so there is no where else to look for dhcp information that's why my next-server is the same as my server.After this step we run
cobbler check. This commands checks that all things are in place and everything is fine. If this command reports the following:
No setup problems found.
Manual review and editing of /var/lib/cobbler/settings is recommended to tailor cobbler to your particular configuration.
Good luck.
Then we are done with our cobbler's pre-configuration steps. Now is the time to proceed and configure cobbler.
Before starting the configuration of Cobbler I would like to mention some terminology of it. In Cobbler we have Distro, Profile and Systems.
They can be viewed as in a hirearchy:
Distro -> Profile -> Systems.
Like for example:
Fedora Core 6 -> WebServer -> System A, System B
Fedora Core 6 -> MailServer -> System C, System D
Redhat 5 -> DNSServer -> System E
So we have one Distro within which we can have one or more than one profile and within that we can have one or more than one or even zero systems. I hope you got my point.
So in our case I created first of all a Distro entry for Cobbler with the
They can be viewed as in a hirearchy:
Distro -> Profile -> Systems.
Like for example:
Fedora Core 6 -> WebServer -> System A, System B
Fedora Core 6 -> MailServer -> System C, System D
Redhat 5 -> DNSServer -> System E
So we have one Distro within which we can have one or more than one profile and within that we can have one or more than one or even zero systems. I hope you got my point.
So in our case I created first of all a Distro entry for Cobbler with the
cobbler distro add command.cobbler distro add --name=rhel5-dvd --kernel=/rhel5/Dump/images/pxeboot/vmlinuz --initrd=/rhel5/Dump/images/pxeboot/initrd.img --arch=x86This created a distro inside cobbler's configuration (which is stored in
After adding a distro we add a profile inside that distro. I create a profile for the new machines I am going to install later. To create a profile this command I gave:
/var/www/cobbler).After adding a distro we add a profile inside that distro. I create a profile for the new machines I am going to install later. To create a profile this command I gave:
cobbler profile add --name=redhat5y --distro=rhel5-dvd –kick-start=/rhel5/Dump/ks.cfg
The above command is simple to understand. It tells that the profile name is
redhat5y and it's a profile for distro rhel5-dvd I created earlier. The –kick-start option tells the path of the ks.cfg I created earlier for my new physical machines going to be installed later. After creating the profile I can proceed by creating system within the profile.For example I want to add a systemA in the profile
redhat5y I can give the following command:
cobbler system add –name= --profile=redhat5y
Here name can be a ip address, MAC address or DNS resolvable hostname. I didn't tried the above command as it was a little confusing and the other thing was that I was going to have only one more system to install so I didn't need a system within
redhat5y profile. I can use the profile itself to install the new system. It sounds a little confusing right? Well let me explain it a little bit more. We created a distro and within that distro we created a profile. Now what actually is going on is that there is a database getting created in cobbler in hirearchial manner. Under which on top is the distro within it is a profile. For further customization I can add system's data within that profile. But if I don't add any system within the profile then also I can continue. I can very well use the profile to boot systems. That way new systems will inherit the profile directly there is no need to be more specific about particular system but if in case we want customization we can add a system data within a cobbler profile.After creating the profile we are done almost with the configuration of cobbler and now we proceed to start cobbler.
Starting cobbler is simple with the command
cobbler sync. This commands reads the database distro, profile, systems (if any) and write's /etc/dhcpd.conf and starts the dhcp server service. After it's done we can see a cobbler report with the command cobbler report. This command lists the distro's the profiles within those distro's and systems if any.After all this we switch to client side. On the client side we need a PXE boot enabled LAN card. I got one from my friend. Most of the LAN card today come with PXE support. I selected PXE boot as first boot device priority from within the BIOS and it booted from the PXE. Got IP address from my cobbler server managed dhcp. Then showed the boot: prompt. Here you can type in the profile name and press enter and it will boot into that profile automatically or if you have a system within a particular profile you can just enter the system name here and it will boot the configuration for that particular system. As I haven't created any systems within my
redhat5y profile I typed in my profile name that is redhat5y and pressed enter. If you want to see the list of all the available profiles and systems within them you can type menu at the boot: prompt.When I gave the profile name at the
boot: prompt what it actually did was it read /tftpboot/pxelinux.cfg/default file inside which there was a entry for redhat5y profile telling what kernel to boot and which initrd image to use. All was specified when I added a new profile from cobbler profile add command earlier. And when I ran cobbler sync command it was written to /tftpboot/pxelinux.cfg/default. After the initial boot it switched to ks.cfg file to get install information. The only information it asked me was the partitioning which I left commented in ks.cfg (for the sake of my data you can very well specify this too). And after that it installed the client machine. It took very less time and a small user intervention (which can also be eradicated).So I got a new client installation from provisioning. It all sounds a little complex but once we do this practically things become more clear. So in the next step I tried to install a xen virtual machine from PXE boot. For that all I did was create a new distro named rhel5-xen and within that distro a new profile named
redhat5x
cobbler distro add –name=rhel5-xen –kernel=/rhel5/Dump/images/xen/vmlinuz –initrd=/rhel5/Dump/images/xen/initrd.img --arch=x86
See the above command the only major difference between the earlier distro I created and this one is the kernel and initrd images. These one are for xen (see the pathname).
Then I created a profile
Then I created a profile
redhat5x within this distro:
cobbler profile addd --name=redhat5x --distro=rhel5-xen --kick-start=/rhel5/Dump/ks1cfg --virt-file-size=2 –virt-ram=256
For the sake of convience I am posting my ks1.cfg file I used to install the virtual machine. In this kickstart file I specified the partitioning information and in this one I used nfs as my installation method (that can be configured very easily).
install
nfs --server=192.168.1.5 --dir=/rhel5/Dump
key 2515dd4e215225dd
lang en_US.UTF-8
keyboard us
network --bootproto=bootp --device=eth0 --onboot=on
rootpw --iscrypted $1$VwD9nalr$06K0bUawzanX72gNk0es91
firewall --disabled
authconfig --enableshadow --enablemd5
selinux --disabled
timezone --utc Asia/Calcutta
bootloader --location=mbr --driveorder=xvda --append="console=xvc0"
# The following is the partition information you requested
# Note that any partitions you deleted are not expressed
# here so unless you clear all partitions first, this is
# not guaranteed to work
clearpart --all --drives=xvda
part /boot --fstype ext3 --size=100 --ondisk=xvda
part pv.2 --size=0 --grow --ondisk=xvda
volgroup VolGroup00 --pesize=32768 pv.2
logvol / --fstype ext3 --name=LogVol00 --vgname=VolGroup00 --size=1024 --grow
logvol swap --fstype swap --name=LogVol01 --vgname=VolGroup00 --size=144 --grow --maxsize=288

%packages
@admin-tools
@base
@core
The above profile add command created a profile within distro
rhel5-xen. With a new kickstart which was specially written for xen virtual machine. Now the new arguments in the above command one tells the image file size was 2GB. This image file is used to store the virtual machine on the hard disk just like vmware uses files to emulate hard disks within the virtual machine we see partitions but on hard disk they are files actually in case of xen they are .img files and if not specified are stored in /var/lib/xen/images/(cobbler stores them here). The second argument tells the amount of RAM to be given to the virtual machine. I have 512 MB physical RAM on my system out of which I gave 256 MB with the above argument. I tried to gave 128 MB RAM but it failed during booting of the virtual machine for the first time itself with some xen error reporting balloon error.After I added the profile it was time to start the virtual machine installation. But wait it is not the same as we did earlier in case of physical machines it's different. We use a new technology software from RedHat named
koan'. Koan helps start the virtual machine from the cobbler's profile. I installed the software from here. The installation was as that of cobbler. Just extract the file and from within the source directory run python setup.py install. After it's installed just run the following command:
koan --virt –server=192.168.1.5 –profile=redhat5x
The above command tells koan that we are going to install a virtual machine (--virt). The next argument tells the cobbler server's ip address and the last one tells the profile name on the cobbler server. This thing was really amazing. Koan communicated with cobbler server and checked for the profile redhat5x (which was there) and started the installation of the virtual machine. Actually it starts the installation and ends up. What it gives is a alpha-numeric number which we need to use in xm console command to get a console of the virtual machine (so that we can see what's going on during the installation). The number is like 00_16_3E_6B_D5_39. I used this and gave the below command after koan return me to the shell:
xm console 00_16_3E_6B_D5_39
This command connected me to the virtual machine 00_16_3E_6B_D5_39. This name is given by koan so that it maintains uniqueness of the virtual machine. Later we use this number as our virtual machine name. I haven't digged into this number but it's a sort of MAC address type which I will look into more detail later. For the time being my installation of the virtual machine started and ended very soon. Was fast.
After the installation finished the virtual machine rebooted and it was there. It was a working xen virtual machine installation using cobbler and koan in RedHat Enterprise 5 Beta2.
Later we can use the libvirt to manage the virtual machine as we did for other virtual machines that thing is the same.
So in this article I wrote about provisioning which is simplified and give more power with the new emerging technology like cobbler and koan. I will be working on some more things in the coming days specially kickstart templating and enchant. There are a lot of thing's in cobbler and koan we can use according to our use I haven't mentioned them all but I hope once you get started with this technology you will automatically start reading about them. Well there is no good documentation about cobbler except the man pages and of-course the mailing list.
Thanks for your time. Will see you soon!
After the installation finished the virtual machine rebooted and it was there. It was a working xen virtual machine installation using cobbler and koan in RedHat Enterprise 5 Beta2.
Later we can use the libvirt to manage the virtual machine as we did for other virtual machines that thing is the same.
So in this article I wrote about provisioning which is simplified and give more power with the new emerging technology like cobbler and koan. I will be working on some more things in the coming days specially kickstart templating and enchant. There are a lot of thing's in cobbler and koan we can use according to our use I haven't mentioned them all but I hope once you get started with this technology you will automatically start reading about them. Well there is no good documentation about cobbler except the man pages and of-course the mailing list.
Thanks for your time. Will see you soon!
Monday, March 05, 2007
Configuring Xen para virtualization in Redhat Enterprise 5
Hello to everybody. In one of my last post I discussed about Xen and virtualization in Redhat Enterprise 5. Well at that time I was not able to configure virtual machine via the virtualization tool but after that I researched alot about this topic and finally was able to configure Xen on my Redhat Enterprise 5.
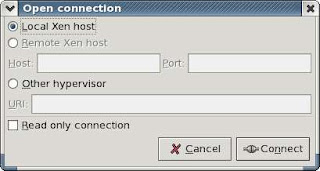
In this window select Local Xen Host and Click on Connect. Note this window helps us to connect to a remote host that is running Xen. Very useful !!
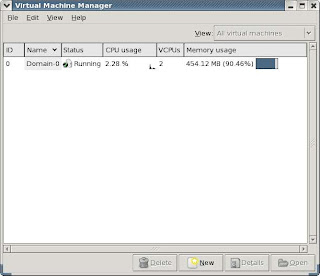
So here's how the Virtual Machine Manager looks. Note here that right now I am running the host domain0 only so only that is shown but we will create a new domain (domainU) soon.
So after clicking the New button the Create Virtual Machine wizards starts. This wizard asks some input regarding the new virtual machine and finally creates it.
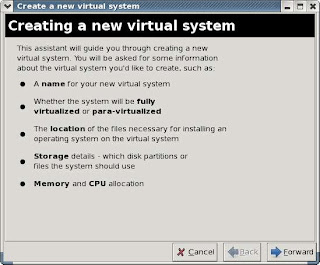
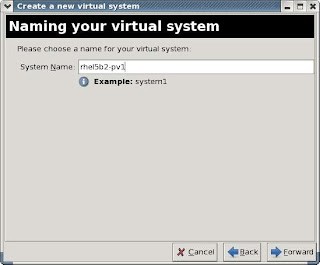
First of all it asks the name of the virtual machine. I gave rhel5b2-pv1 (Redhat Enterprise Linux 5 beta2 para virtualized 1).
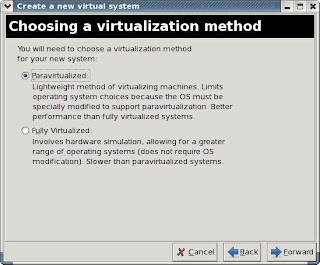
Now the wizard ask about the virtualization method. We select para-virtualization (unique point about Xen). Para virtualization is what I have configured till now and it's working I have not tried full virtualization (will try it soon with Windows XP guest).
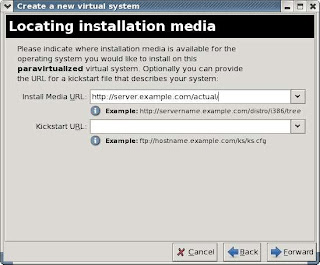
In this step the wizard ask about the installation source. Two options are provided I choosed the first one and specified my installation source http://server.example.com/actual (I have DNS and APACHE configured on my system).
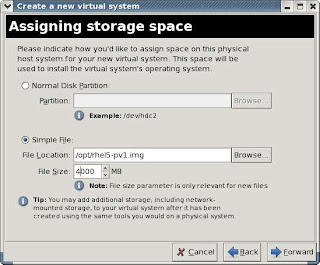
In this step the wizard ask about the storage. How the virtual machine is going to be stored on the disk. I choosed the file way and specified the file as /opt/rhel5b2-pv1.img and size 4GB.
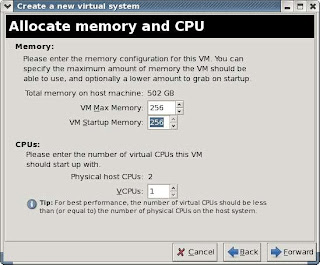
In this step the wizard asked about the memory I want to give to the virtual machine. I gave 256MB to my RHEL5 virtual machine. Note the GUI was a little buggy in showing my system memory as 502 GB instead of 502 MB (LOL). Also in this step the wizard asked about the VCPU which I specified 1 (I have centrino duo).
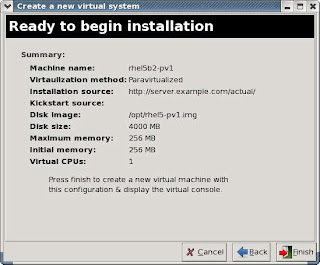
This was a summary of all the options specified earlier by me. Finally I clicked Finish Button.
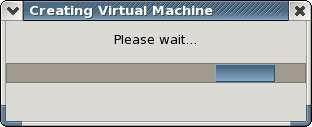
This little window showed a progress bar and behind the scene it was creating a virtual machine. It was also establishing a VNC connection so that I can see the installer in a window in my host OS.
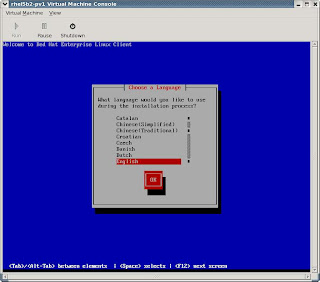
So this was the window I was shown with. This is the first screen the window showed to me. After that the anaconda installer started. Asked me the partition layout, root password, time zone, network configuration and package selections.
Finally when all configuration was done the install process started. This is just before it started (I captured this screen because with my NFS installation it hanged during this process).
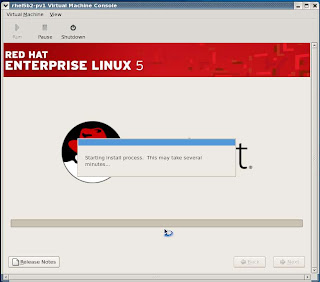
The installation finished in about 20 minutes as it was a very minimal installation around 940MB. No X-window no GNOME just pure Console. When the installation finsihed it rebooted and showed nothing I had to select Serial Console from the View Menu (Virtual Machine Console) and it showed me the login prompt.
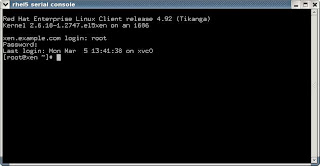
Using this console I logged in to my virtual machine and used it. LOL.
When I was finished with all this I shut down the virtual machine and did somethings. First of all I saw that my dom0 (default domain) which was compressed to use 212 MB RAM when my virtual machine was running still used 212 MB. Performance was slow. I need to give it the whole RAM now but how I do that. Well I figured out a way (searching internet):
In command line
Inside the virsh prompt
The first command connects virsh to the local hypervisor and the second command sets the memory of Domain-0 (Domain Name) to 500MB. To see the name of your domain issue list command inside the virsh prompt.
Now I wanted to start my virtual machine automatically during next boot up. This is how I did it.
What I did here was I went to /etc/xen/auto and created a symlink to my /etc/xen/rhel5b2-pv1 file in this directory. /etc/xen/rhel5b2-pv1 was the Xen configuration file for my virtual machine. And if I want to start my virtual machine during every boot up I need to place a symlink for it's config file in /etc/xen/auto. This symlink is read by xendomains service. So I
So the service get's started at every bootup.
When you don't want to use the virtual machine just do this
But if you want to assign all the physical RAM after this to the default domain you have to again call virsh and do what I told earlier. I need to figure out a easy way to do this (hack the /etc/init.d/xendomains script maybe).
Well this was it and hope you also got Xen installed and configured in your linux. I was specific about the OS that is Redhat Enterprise Linux 5. Virtualization is alot easier in RHEL5 and hope to see more in the final release of RHEL5.
What Redhat guys have done is that they have used a API called libvirt that talks to Xen. libvirt is simply great written in C language having bindings for Python and Perl. This API helped them to write the simple yet powerful GUI 'virt-manager' for configuring and managing the virtual machines. They are doing great work at Redhat Emerging Technology. I have also tried the new virtual machine manager (GUI) and they have included alot more options in it (latest release is 0.3.1). Hope to see the new Virtual machine manager in Final release of RHEL.
Well, I had alot of problems with Xen earlier and I like to discuss them here. My first problem was during virt-install and it was:
libvir: Xen Daemon error : POST operation failed: (xend.err 'Error creating domain: I need 262144 KiB, but dom0_min_mem is 262144 and shrinking to 262144 KiB would leave only 235124 KiB free.')I eradicated this problem by editing /etc/xen/xend-config.sxp. In this file I edited dom0-min-mem and changed it to (dom0-min-mem 128).
Now I rebooted and again tried to create a new virtual machine but this time I got this error:
Now I rebooted and again tried to create a new virtual machine but this time I got this error:
libvir: Xen Daemon error : POST operation failed: (xend.err 'Device 0 (vif) could not be connected. Hotplug scripts not working.')This I figured out as a problem due to my wireless device (eth1). Problem was that the Xen created a virtual network device xenbr1 which was bridged to eth1. But virt-install was looking for xenbr0 which was not present. Soon I found xenbr0 is the default virtual network device virt-install looks for. We can though change the default but I preferred the default so I disabled my wireless (eth1) and enabled my ethernet (eth0). So this time Xen created xenbr0 bridged virtual network device and virt-install detected it.
Well virt-install is a command line tool to create a new virtual machine that I used in CUI to create a virtual machine but here I am writing the GUI way that is too easy and user friendly. But before that some configuration steps. I saw on the internet that Xen para virtualized guests can only be installed via a NFS or HTTP or FTP install source location. So I preferred the NFS way as it's too easy. I configured /etc/exports to export /dvd/actual which contained my RHEL5-Client DVD data. But I was never able to install via a NFS source. My installation always hanged. It hanged saying "Starting Install process. It will take several minutes to start.." This message comes when the final installation is about to begin (after all options are specified like Partitions, packages, passwords etc.). I never figured out a way to debug this thing so I changed my installation source.
This time I used a HTTP source. So I configured Apache Webserver for my installation source. These were the VirtualHost configuration lines:
<VirtualHost "192.168.1.5:80"> ServerAdmin root@server.example.com
DocumentRoot "/dvd"
ServerName server.example.com
ErrorLog logs/server.example.com-error_log
CustomLog logs/server.example.com-access_log common
</VirtualHost>
So my HTTP source now was http://server.example.com/actual. Great so let's get started.
First of all I booted the Xen enabled kernel. Here is my Xen enabled kernel lines of grub.conf:
First of all I booted the Xen enabled kernel. Here is my Xen enabled kernel lines of grub.conf:
title           Red Hat Enterprise Linux Client (2.6.18-1.2747.el5xen)
root            (hd0,5)
kernel          /boot/xen.gz-2.6.18-1.2747.el5
module          /boot/vmlinuz-2.6.18-1.2747.el5xen ro root=LABEL=/ rhgb quiet
module          /boot/initrd-2.6.18-1.2747.el5xen.img
Note that I specified no dom0_mem= variable in kernel line. All was handle via dom0_min_mem in /etc/xen/xend-config.sxp.
See I understand what all this means but I am hiding all these details so that this thing becomes easy.
When my Xen enabled kernel booted the xend service started automatically. See we need xend service to get started successfully if we want to create a new virtual machine via Xen.
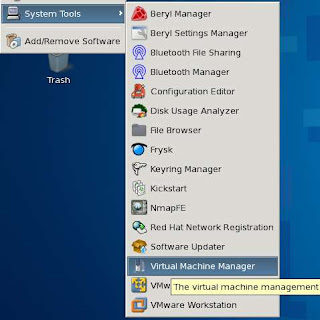
Now I started Virtual Machine Manager present in Application -> System Tools.


virshInside the virsh prompt
virsh # connect virsh # setmem Domain-0 500000cd /etc/xen/autoln -s ../rhel5b2-pv1 .chkconfig xendomains onservice xendomains stopTuesday, February 27, 2007
Configuring Yum in RHEL5 for DVD source
In my last article I explained the problem I faced with the installation of software in RHEL5 Beta2. I tried system-config-packages and the old "rpm" command but nothing worked as it used to in earlier days. So I thought to dig into this thing and tried to find the possible cause and solution to this problem.
So I went on to GNU/Linx community and put up this question. Okay I got some inputs some directions and finally I got what I wanted. First of all let me tell you the scenario once more so that you can better get what I want to say.
Suppose you have installed a RHEL5 system and now after the installation is complete you want to install a package (which is not installed). You put in the DVD and mount it. Go to the said directory and try to install the package via the well old "rpm" command. But to your surprise you found that it failed due to dependency problems. Okay no problem. We all know how to deal with it. We use the "--aid" switch with our "rpm" command that will automatically install the dependency rpm first then the said rpm. Well we try that but it again failed with the same error message. That means it's not finding the dependency rpm. But wait. The dependency rpm and the rpm we want to install both are in the same directory then why is the "rpm" command failing.
Well that's because in RHEL5 (as in Fedora Core 6) all the things are controlled by "yum". I read somethings about "yum" and quickly found that it had problem with dvd sources. But I didn't found any thing on how to disable "yum" completely and go through the well old command line way of installing packages. But I found a way out by which "yum" can access DVD sources and if that happens we can install/un-install packages easily either via graphical tool(system-config-packages) or the command line via "yum" command.
Okay so let's start this.I inserted the RHEL5 Client DVD and mounted it on /media/dvd/
So I went on to GNU/Linx community and put up this question. Okay I got some inputs some directions and finally I got what I wanted. First of all let me tell you the scenario once more so that you can better get what I want to say.
Suppose you have installed a RHEL5 system and now after the installation is complete you want to install a package (which is not installed). You put in the DVD and mount it. Go to the said directory and try to install the package via the well old "rpm" command. But to your surprise you found that it failed due to dependency problems. Okay no problem. We all know how to deal with it. We use the "--aid" switch with our "rpm" command that will automatically install the dependency rpm first then the said rpm. Well we try that but it again failed with the same error message. That means it's not finding the dependency rpm. But wait. The dependency rpm and the rpm we want to install both are in the same directory then why is the "rpm" command failing.
Well that's because in RHEL5 (as in Fedora Core 6) all the things are controlled by "yum". I read somethings about "yum" and quickly found that it had problem with dvd sources. But I didn't found any thing on how to disable "yum" completely and go through the well old command line way of installing packages. But I found a way out by which "yum" can access DVD sources and if that happens we can install/un-install packages easily either via graphical tool(system-config-packages) or the command line via "yum" command.
Okay so let's start this.I inserted the RHEL5 Client DVD and mounted it on /media/dvd/
mkdir -p /media/dvdmount /dev/dvd /media/dvdmkisofs -o /opt/RHEL5.iso -r /media/dvd/The above command took sometime as I was creating a image file for my DVD (approx 3.6GB). Well after sometime it finished. Now was the time to do the real job. There was no use of the DVD so i unmounted and ejected it.
umount /media/dvd/ejectNow I created a directory which will act as mount point for the ISO file I created earlier.
mkdir -p /dvd/actualNow I mounted the ISO file onto the above mount point. Note that to mount the ISO file we need to use special options. So let's see what is the command.
mount -r -o loop -t iso9660 /opt/RHEL5.iso /dvd/actualThe above command mounted the RHEL5 ISO on /dvd/actual. Now I went to the mount point directory and installed a rpm called "createrepo".
cd /dvdrpm -Uvh actual/Client/creatrepo*The need for this RPM arises because the DVD of RHEL5 (also of FC6) has "media:" written in it's metadata that creates problem with "yum". Now by using this createrepo I will create a copy of my own for the repodata that will not be having the "media:" thing and that will help me use the repodata with "yum" and hence the software using "yum" too like "system-config-packages" or "pirut".
Now it's time to create the repodata. This is how I did that (note: I didn't changed my current directory. Was where I was previously).
Now it's time to create the repodata. This is how I did that (note: I didn't changed my current directory. Was where I was previously).
createrepo .Above command indexed around 2239 Packages and created a repodata/ directory in the current directory of around 8.1 MB. This directory had the repomod.xml and other metadata files. Actually what it did was it indexed all the RPM's present in the current directory, that was "/dvd". So I had rpm's in
/dvd/actual/Client, /dvd/actual/VT, /dvd/actual/WorkstationAll got indexed and the metadata was created.
I also copied the GPG key files to my hard disk (to tell yum to use them later).
cp /dvd/actual/*GPG* /optThere were around 4-5 GPG files they got copied to /opt. Later we will see that we can make "yum" to read these GPG key files and verify a package before installing.
Now finally came the time to tell yum to use this repo to for my installations. That was done by creating a repo file in /etc/yum.repos.d/. This is how it was done:
Now finally came the time to tell yum to use this repo to for my installations. That was done by creating a repo file in /etc/yum.repos.d/. This is how it was done:
cd /etc/yum.repos.d/vi dvd.repoInside this file I wrote the following:
[dvd]name=RHEL5DVDbaseurl=file:///dvdenabled=1gpgcheck=1gpgkey=file:///opt/RPM-GPG-KEY file:///opt/RPM-GPG-KEY-beta file:///opt/RPM-GPG-KEY-fedora file:///opt/RPM-GPG-KEY-fedora-testSaved the /etc/yum.repos.d/dvd.repo file. Now I thought of disabling the plugins for RHN and "InstallOnly Packages". So I went to /etc/yum/pluginconf.d/ and opened the configuration file for each plugin and made "enabled=1" to "enabled=0".
Now finally I updated my "yum" so that it reads the new repo and other settings once again. For that I did:
Now finally I updated my "yum" so that it reads the new repo and other settings once again. For that I did:
yum clean allyum updateVoila.It's finally done. But hey wait.When I install a package from where will it select the package rpm.It will do that from the mounted ISO.That means I need to mount the ISO everytime.
Well I can use fstab for that.So I created a entry in /etc/fstab so that my ISO gets mounted automatically on boot.
Here was the entry I made in /etc/fstab:
Well I can use fstab for that.So I created a entry in /etc/fstab so that my ISO gets mounted automatically on boot.
Here was the entry I made in /etc/fstab:
/opt/RHEL5.iso /dvd/actual iso9660 defaults,ro,loop 0 0Now I ran system-config-packages and search, browse, install and un-install RPM's easily. Now the GUI Package manager can search for installed as well as not installed rpm's. That's great. But the most important thing is that it if install a RPM which needs a dependency RPM (which is not installed) the Package manager will tell us that there is a dependency and will install it automatically.Great !. Same goes for un-installation of packages.If some package is acting as a dependency for some other package and we try to remove it then it will show a message and will ask us what to do.
For command line lovers "yum" command will work. Now they can search package via yum search or if they don't remember the name they can see the large list using yum list command.For installing yum install.This will handle the dependencies too.
Okay so I finally managed to find a way out. But it was a real pain.
But as they say "No Pain No Gain".
Meanwhile I have not formatted my RHEL5 but instead of that in my Vista partition I have installed Ubuntu 7.04 Herd 4. So now I have two Linux RHEL5 Beta2 (Client) and Ubuntu 7.04 Herd 4. Well I kept RHEL5 so that I can learn some more new things.
All in all Package management in RHEL/Fedora needs a great improvement.Today I call upon the developers to come together and help the Redhat guys to improve the "yum","pirut" and "system-config-packages".
For command line lovers "yum" command will work. Now they can search package via yum search
Monday, February 26, 2007
Linux Distros
Well, it has been a long time since I wrote here. I have been busy with my exams and then got busy trying the new linux distro versions. In these days I tried my hands on the Redhat Enterprise Linux 5 Beta2(RHEL). It was a great experience trying a enterprise product. I downloaded the huge 3.6 GB Client DVD.So let's see how was the drive with RHEL5.
Installation procedure (anaconda) was exactly a copy of Fedora Core 6. I had tried FC6 earlier but only once and then I never used it. Same went for RHEL5. During installation it asked me to enter a key. That was the only difference I saw between FC6 and RHEL5 installation. I got the key from internet (I don't remember from where) and now I don't have the key. LOL.
The few changes I noted down between the previous release of RHEL and this release were that this release had 3D Desktop all because of AIGLX enabled Xorg 7.x. Compiz was providing the desktop effect. I also saw in this release Xen enabled 2.6.18 kernel. Oh wait. Let me show you the `uname -a` of RHEL5 beta2:
Well the above one is not Xen enabled kernel but if you choose virtualiaztion as a installation option you surely get Xen only. Other changes were Eclipse, JAVA etc. development tools available in this release. I selected all of these and the Servers too. The installation took around 35 minutes. Wow. That was fast.
Okay. Now I booted the Kernel and as it should be, Xen started. Xend (Xen daemon) also started. Most notably I saw Avahi daemon. It was great to see it in RHEL(now surely will get to see some great desktop).
Okay so here came the Login screen. But hey what's that. My resolution was not according to my laptop it was 1024x768 it should be 1280x800. No problem. I logged in(via root). So as I have guessed it was just like Fedora 6. No change. The following hardware which I need as soon as I install a Operating System didn't worked in RHEL5.
Installation procedure (anaconda) was exactly a copy of Fedora Core 6. I had tried FC6 earlier but only once and then I never used it. Same went for RHEL5. During installation it asked me to enter a key. That was the only difference I saw between FC6 and RHEL5 installation. I got the key from internet (I don't remember from where) and now I don't have the key. LOL.
The few changes I noted down between the previous release of RHEL and this release were that this release had 3D Desktop all because of AIGLX enabled Xorg 7.x. Compiz was providing the desktop effect. I also saw in this release Xen enabled 2.6.18 kernel. Oh wait. Let me show you the `uname -a` of RHEL5 beta2:
Linux deepsa.lenovo 2.6.18-1.2747.el5 #1 SMP Thu Nov 9 18:55:30 EST 2006 i686 i686 i386 GNU/LinuxWell the above one is not Xen enabled kernel but if you choose virtualiaztion as a installation option you surely get Xen only. Other changes were Eclipse, JAVA etc. development tools available in this release. I selected all of these and the Servers too. The installation took around 35 minutes. Wow. That was fast.
Okay. Now I booted the Kernel and as it should be, Xen started. Xend (Xen daemon) also started. Most notably I saw Avahi daemon. It was great to see it in RHEL(now surely will get to see some great desktop).
Okay so here came the Login screen. But hey what's that. My resolution was not according to my laptop it was 1024x768 it should be 1280x800. No problem. I logged in(via root). So as I have guessed it was just like Fedora 6. No change. The following hardware which I need as soon as I install a Operating System didn't worked in RHEL5.
a) Wireless Internet
b) Bluetooth
c) Proper Screen Resolution.
Okay. So I went on searching for drivers for ipw3945. I got to know that redhat had ipw3945 in Beta1 but they removed it due to some license problem. What the Fuck. They say if we include propertiery modules we get problem later. Here's what they say exactly (I have converted it into a story).
Suppose redhat includes ipw3945 for example in RHEL5. Client A purchase RHEL5 installs it and use it. And after sometime Client A gets problem in it. Client A calls the redhat customer support guy and ask to fix the problem. Customer support department detect problem was due to a propertiery module named ipw3945. The guy tells Client A to please not install the module. Now the Client tells the guy that if you have given the module you need to better fix it. Not installing the module is not a solution. In this case note that the client didn't required ipw3945 but ipw3945 was somewhere conflicting with some other crucial module. So redhat thought not to have propertiery module.
Now guys who need ipw3945 goes to atrpms and install from there. Note that installing these things from internet is a real pain. All because of the dependencies problem. I am of the favour that if Linux somehow solves the Dependency problem they really have a easy path ahead (Ubuntu has done it very well).
Okay so I went to the above mentioned website and downloaded the daemon rpm, kernel module rpm and installed them. Then via system-config-network I configured my wireless with a 128 bit WEP Key. Oh to my surprise I saw that my wireless doesn't starts at boot (even after telling it to start on boot automatically). I figured out a way soon. I have to switch off my wireless(on my laptop) and again switch it on after the boot process completes. The problem is that it is not associating with the Access point. I don't know if there is some other solution to this problem but I am going with the above solution right now.
Bluetooth was working without any problem so it was nice. Well now comes the resolution problem. I have been facing this problem with many linux distros. Only OpenSuse 10.1 gave me proper resolution for others I have to use 915resolution. So I did the same for RHEL5. I went to the website (mentioned above) and downloaded 915resolution configured it for 1280x800 and in such a way that the service for it starts automatically during boot. Okay now what I am left with. Xen? Yeah. I have tried this tool earlier with RHEL4 but never got success and to my surprise it was way too easy in RHEL5 Beta2 with the new virtualization manager (GUI) tool to create, configure and modify new virtual machines based on Xen. But I never got success in configuring one for me. And the major reason for that I find is my RAM. I need to have at-least 1GB RAM otherwise there is no point having Xen.
So I installed my old friend VMware workstation. But this time it was a new version. Yes the Beta 6.0. It was easy to install and configure as this time it has the code to compile vmnet and vmmon drivers for 2.6.18 kernel with GCC 4.1.1. Okay. So I got through with virtualization but hey wait. When we will see a user friendly open source virtualiaztion tool that has capablities just like VMware. Xen is promising but it's not for beginners.
Okay so what I am left now. Oh Yes. The 3D Desktop. Well it was easy just go to System > Preferences > 3D Desktop effects and enable it and BOOM it's on. Well it was Compiz utilizing AIGLX power. But as I have tried beryl and I felt in love with it along time ago I went on installing beryl via SVN on RHEL5. It was easy. I got beryl 0.2.0rc3 installed in a few minutes and up running with most of the effects and 3D Desktop is on. Well according to Redhat they have included 3D desktop just for a technological preview in RHEL5. They don't mean to have this kind of software in a enterprise product. It's good. Sometime we get bore at that time we can play with the desktop cubes. LOL.
Well now comes the most important part. And in a enterprise product like RHEL5 it's the servers. I tried DNS (BIND-9), APAHCE and SQUID. Well I found not much difference between the earlier (RHEL4) and these ones (RHEL5). The important difference I saw was in DNS. Earlier they use to have a caching-nameserver RPM in only AS and ES version not the WS version. But this time they had that rpm in Client RHEL5 Dvd. Well it's a DVD so it need to have more softwares. I didn't downloaded the Server DVD which was less in size. But I think the only difference between server and client DVD is that the server DVD is going to have the Cluster suite too (GFS too).
The installation of software via the DVD after a base installation is there can be easily done through system-config-packages. It tries to find a connection with RHN(Redhat Network for Update). But as my system is not registered with Redhat it couldn't connect to the RHN servers. But can I install RPM from the DVD via this GUI tool. Let's see.
I started system-config-packages. Searched for a package named zsh which was on the DVD but not installed the search result said no packages were found. But what's that. I have the package on the DVD. Okay I figured out the problem. The problem was that each time this Add/Remove Software program starts it runs a plugin called
Suppose redhat includes ipw3945 for example in RHEL5. Client A purchase RHEL5 installs it and use it. And after sometime Client A gets problem in it. Client A calls the redhat customer support guy and ask to fix the problem. Customer support department detect problem was due to a propertiery module named ipw3945. The guy tells Client A to please not install the module. Now the Client tells the guy that if you have given the module you need to better fix it. Not installing the module is not a solution. In this case note that the client didn't required ipw3945 but ipw3945 was somewhere conflicting with some other crucial module. So redhat thought not to have propertiery module.
Now guys who need ipw3945 goes to atrpms and install from there. Note that installing these things from internet is a real pain. All because of the dependencies problem. I am of the favour that if Linux somehow solves the Dependency problem they really have a easy path ahead (Ubuntu has done it very well).
Okay so I went to the above mentioned website and downloaded the daemon rpm, kernel module rpm and installed them. Then via system-config-network I configured my wireless with a 128 bit WEP Key. Oh to my surprise I saw that my wireless doesn't starts at boot (even after telling it to start on boot automatically). I figured out a way soon. I have to switch off my wireless(on my laptop) and again switch it on after the boot process completes. The problem is that it is not associating with the Access point. I don't know if there is some other solution to this problem but I am going with the above solution right now.
Bluetooth was working without any problem so it was nice. Well now comes the resolution problem. I have been facing this problem with many linux distros. Only OpenSuse 10.1 gave me proper resolution for others I have to use 915resolution. So I did the same for RHEL5. I went to the website (mentioned above) and downloaded 915resolution configured it for 1280x800 and in such a way that the service for it starts automatically during boot. Okay now what I am left with. Xen? Yeah. I have tried this tool earlier with RHEL4 but never got success and to my surprise it was way too easy in RHEL5 Beta2 with the new virtualization manager (GUI) tool to create, configure and modify new virtual machines based on Xen. But I never got success in configuring one for me. And the major reason for that I find is my RAM. I need to have at-least 1GB RAM otherwise there is no point having Xen.
So I installed my old friend VMware workstation. But this time it was a new version. Yes the Beta 6.0. It was easy to install and configure as this time it has the code to compile vmnet and vmmon drivers for 2.6.18 kernel with GCC 4.1.1. Okay. So I got through with virtualization but hey wait. When we will see a user friendly open source virtualiaztion tool that has capablities just like VMware. Xen is promising but it's not for beginners.
Okay so what I am left now. Oh Yes. The 3D Desktop. Well it was easy just go to System > Preferences > 3D Desktop effects and enable it and BOOM it's on. Well it was Compiz utilizing AIGLX power. But as I have tried beryl and I felt in love with it along time ago I went on installing beryl via SVN on RHEL5. It was easy. I got beryl 0.2.0rc3 installed in a few minutes and up running with most of the effects and 3D Desktop is on. Well according to Redhat they have included 3D desktop just for a technological preview in RHEL5. They don't mean to have this kind of software in a enterprise product. It's good. Sometime we get bore at that time we can play with the desktop cubes. LOL.
Well now comes the most important part. And in a enterprise product like RHEL5 it's the servers. I tried DNS (BIND-9), APAHCE and SQUID. Well I found not much difference between the earlier (RHEL4) and these ones (RHEL5). The important difference I saw was in DNS. Earlier they use to have a caching-nameserver RPM in only AS and ES version not the WS version. But this time they had that rpm in Client RHEL5 Dvd. Well it's a DVD so it need to have more softwares. I didn't downloaded the Server DVD which was less in size. But I think the only difference between server and client DVD is that the server DVD is going to have the Cluster suite too (GFS too).
The installation of software via the DVD after a base installation is there can be easily done through system-config-packages. It tries to find a connection with RHN(Redhat Network for Update). But as my system is not registered with Redhat it couldn't connect to the RHN servers. But can I install RPM from the DVD via this GUI tool. Let's see.
I started system-config-packages. Searched for a package named zsh which was on the DVD but not installed the search result said no packages were found. But what's that. I have the package on the DVD. Okay I figured out the problem. The problem was that each time this Add/Remove Software program starts it runs a plugin called
Loading "installonlyn" plugin. I don't know how to remove this plugin and how to get a new plugin that can search for me the software present on the DVD and not installed on my system. Okay now I tried to install a RPM from DVD that requires other dependency RPM's via command line (mostly the prefer way with linux administrators). I wanted to test --aid. I tried installing xfig rpm that depended on transfig rpm. Both the RPM's were in /mnt/Client/ directory. I gave the command:
[root@deepsa Client]# rpm -ivh xfig-3.2.4-21.1.i386.rpm --aidI got the result
error: Failed dependencies:
 transfig >= 1:3.2.4-12 is needed by xfig-3.2.4-21.1.i386
But why so. It must have installed the transfig RPM automatically I gave "aid". Now I installed transfig first and then I installed xfig. Now it got installed. Man. It's not what I wanted. It's the same as in Fedora core 6.
The aid switch doesn't work in RHEL? It's very important thing. God knows what will happen to Redhat. I am specially worried after ORCALE release there own Linux which is exact copy of RHEL4 Update 4. I mean aid is what I use to use many times. I mean I taught my students during there RHCE course about this switch but now it's not functioning as it should have. Come on RedHat!!.
The aid switch doesn't work in RHEL? It's very important thing. God knows what will happen to Redhat. I am specially worried after ORCALE release there own Linux which is exact copy of RHEL4 Update 4. I mean aid is what I use to use many times. I mean I taught my students during there RHCE course about this switch but now it's not functioning as it should have. Come on RedHat!!.

This is a screenshot of the GUI based Package Manager in RHEL5 Beta2.
The other problem I faced on my laptop was that the CD/DVD were not getting detected and mounted automatically when I inserted them. I had to use the mount command everytime. I guess problem is with gnome-volume-manager. Guys need to fix it.
All in all I am going to format my RHEL5. Why? I am a desktop user not a server administrator. Sometimes I do some programming with C/C++/GTK+ but I think RHEL5 is better for enterprise not for a home user. Home user requires much more user friendly desktop and application. We don't have CHM reader in RHEL5. We don't have MP3 support (patent problems). We don't have MPEG, AVI players in RHEL5. And lastly the most important issue is the software installation procedure. But that's what a average desktop user wants.
Well if you are having a laptop configuring RHEL5 for your laptop is not much of a problem now. But then also you need to configure somethings before you say it's ready for use.
I am now downloading Herd 4 of Ubuntu 7.04. The only linux distro I tried that is best for a laptop user like me. Wireless no problem. Bluetooth no problem. Resolution no problem. 3D Desktop no problem. MP3, AVI, MPEG it's way to easy to configure and use. I am eagerly waiting for the final release of 7.04 in April. Meanwhile I will try Herd 4 with a 2.6.20 kernel having EXT4 support (experimental). LOL.
The other problem I faced on my laptop was that the CD/DVD were not getting detected and mounted automatically when I inserted them. I had to use the mount command everytime. I guess problem is with gnome-volume-manager. Guys need to fix it.
All in all I am going to format my RHEL5. Why? I am a desktop user not a server administrator. Sometimes I do some programming with C/C++/GTK+ but I think RHEL5 is better for enterprise not for a home user. Home user requires much more user friendly desktop and application. We don't have CHM reader in RHEL5. We don't have MP3 support (patent problems). We don't have MPEG, AVI players in RHEL5. And lastly the most important issue is the software installation procedure. But that's what a average desktop user wants.
Well if you are having a laptop configuring RHEL5 for your laptop is not much of a problem now. But then also you need to configure somethings before you say it's ready for use.
I am now downloading Herd 4 of Ubuntu 7.04. The only linux distro I tried that is best for a laptop user like me. Wireless no problem. Bluetooth no problem. Resolution no problem. 3D Desktop no problem. MP3, AVI, MPEG it's way to easy to configure and use. I am eagerly waiting for the final release of 7.04 in April. Meanwhile I will try Herd 4 with a 2.6.20 kernel having EXT4 support (experimental). LOL.
In the recent months I had tried alot of distros:
a) BackTrack Beta 2.0
b) OpenSUSE 10.2
c) Gentoo 2006.1
d) RHEL5 Beta2
e) Ubuntu Edgy
f) Ubuntu Fiesty Herd 2
Tuesday, January 23, 2007
Exams fever the worst fever for a human being like me.
Today I got my first semester exams date. They are starting from 27th feb 2007. After a long time I am giving exams. So this exam fever is killing me. I am not so use to this fever in the past 1 or so year.
The fever has increased due to the boring subjects I have in my course. And most horrible of them is Discrete Mathematical Structures. The worst subject I have ever read. I haven't studied in the whole semester, attended only 3 classess in college for this subject during the semester and now when I open the book nothing goes in mind. Predicate logic it's formula, normal forms etc. etc. so fucking bore.
God knows what will happen in this exams. Well I am not preparing that hard so I don't expect much but I need to pass.
Will comeback soon with alot of new discoveries I have done in the field of computer science (lol).
The fever has increased due to the boring subjects I have in my course. And most horrible of them is Discrete Mathematical Structures. The worst subject I have ever read. I haven't studied in the whole semester, attended only 3 classess in college for this subject during the semester and now when I open the book nothing goes in mind. Predicate logic it's formula, normal forms etc. etc. so fucking bore.
God knows what will happen in this exams. Well I am not preparing that hard so I don't expect much but I need to pass.
Will comeback soon with alot of new discoveries I have done in the field of computer science (lol).
Sunday, October 22, 2006
Installing OSX86
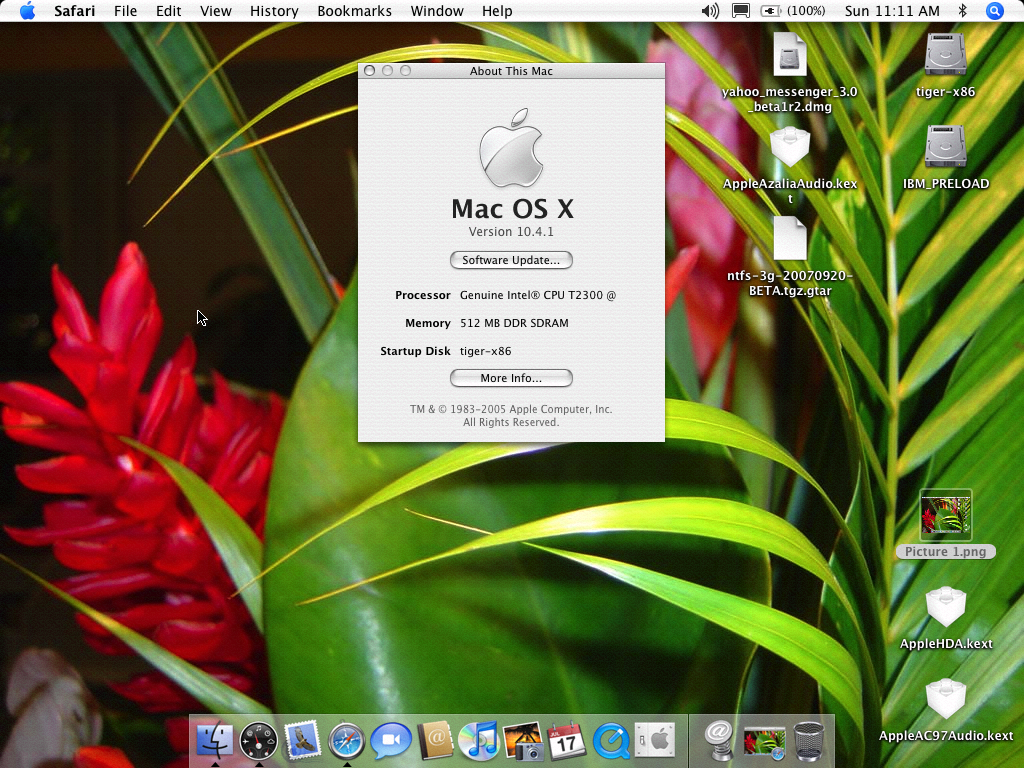
So finally today I got time to give OSX86 a try. I have heard a lot about this. Someone said me it can be only installed on a blank hard drive (you have to make the hard drive blank otherwise loose data). Someone said it doesn't support most of the hardware in the market. But I thought to give it a try.
My first and last concern was that I don't wanted to wipe out my hard drive because it was already housing Windows XP and SuSE Linux. So I went to google searching for the possible paths. I found one after researching quite a lot there.
So here I am writing what I did to get OSX86 on my laptop without wiping Windows XP and SuSE Linux and other data partition.
So here I am writing what I did to get OSX86 on my laptop without wiping Windows XP and SuSE Linux and other data partition.
First of all I downloaded the tiger-x86-flat.img from torrent. It's a huge file around 6 GB so most of the trackers have it in bzip2 compressed format so it's 1.28 GB only. After downloading the bzip2 archive uncompress it via WinRAR on some ntfs partition as FAT32 doesn't support single file size greater than 4 GB. So you need more than 6 GB on some NTFS or EXT3 partition (it too will work).
Secondly download Acronis Disk Director Suite. It's not a free software you need to purchase it if you want to use it. From within this software I resized my C drive housing windows XP. It was a 20 GB partition having 10.8 GB free space. I resized it such that I got unallocated space of 7 GB at the starting and then my C drive reduced to 13 GB.
After that from within Acronis Disk Director Suite I formatted the unallocated space as partition type of “af”.
Now I booted my system from the hard drive and I got grub error 17. Lol. I lost my grub. What a stupid I am, I must have taken backup of my MBR but ok I will manage things somehow.
Now I booted my laptop via a Ubuntu 5.10 Live CD and from within the shell mounted the ntfs drive having my tiger-x86-flat.img file it was /dev/sda5.
Secondly download Acronis Disk Director Suite. It's not a free software you need to purchase it if you want to use it. From within this software I resized my C drive housing windows XP. It was a 20 GB partition having 10.8 GB free space. I resized it such that I got unallocated space of 7 GB at the starting and then my C drive reduced to 13 GB.
After that from within Acronis Disk Director Suite I formatted the unallocated space as partition type of “af”.
Now I booted my system from the hard drive and I got grub error 17. Lol. I lost my grub. What a stupid I am, I must have taken backup of my MBR but ok I will manage things somehow.
Now I booted my laptop via a Ubuntu 5.10 Live CD and from within the shell mounted the ntfs drive having my tiger-x86-flat.img file it was /dev/sda5.
 mkdir /mnt/C
 mount /dev/sda5 /mnt/C
 cd /mnt/C
 dd if=tiger-x86-flat.img of=/dev/sda1 bs=512 skip=63
The last command took around 1 hour. I found a fast alternative to that but I haven't tried so don't know whether it will work or not but one use that method the time taken by the command is around 5 minutes.
Now when I booted my system from the hard drive I again for the Grub 17 error that means the boot loader needs to be installed. Ok now comes the SuSe 10.1 bootable dvd.
I booted from within the DVD and went to rescue shell. From within this shell I issued the following commands to recover my grub.
First of all I mounted my Linux “/” partition.
mkdir /mnt/mm
mount /dev/sda6 /mnt/mm
Now I edit the menu.lst configuration file of grub so that I can boot OSX86.
cd /mnt/mm/boot/grub
vi menu.lst


Title Mac OSX86
rootnoverify (hd0,0)
makeactive
chainloader +1
I also edited my Windows XP and SuSE linux entry because the partition number have changed after adding the HFS partition at the beginning.
Title Windows XP
rootnoverify (hd0,1)
makeactive
chainloader +1
After that I saved the file and quit. Then I issued the command:
grub-install –root-directory='/mnt/mm' /dev/sda
This command installed my grub on the MBR.
After this some basic steps I did so that my Linux and windows can boot properly. I edited my Linux “/etc/fstab” file accordingly (as my partition table has now changed).
I also needed to edit the BOOT.INI in the C: drive otherwise I will get hal.dll erro while booting windows XP. So I mounted the Windows XP partition and edited the BOOT.INI file like this.
I also needed to edit the BOOT.INI in the C: drive otherwise I will get hal.dll erro while booting windows XP. So I mounted the Windows XP partition and edited the BOOT.INI file like this.
mkdir /mnt/C
mount /dev/sda2  /mnt/C
cp /mnt/C/BOOT.INI   /root
chmod  a+w  /root/BOOT.INI
vi /root/BOOT.INI
Edit the partition(1) to partition(2) on the two lines. Save and exit.
umount /mnt/C
chmod a-w /root/BOOT.INI
ntfscp /dev/sda2   /root/BOOT.INI   /mnt/C/BOOT.INI
ntfscp comes with the ntfstools package in SuSE 10.1 otherwise it would have been difficult to write changes on NTFS partition from within Linux.
Now finally I rebooted my laptop from the hard drive and tested all my 3 Operating System. All 3 booted well.
So now I have 3 operating system on my hard drive that are tiger osx86, windows xp home and Suse Linux 10.1 and that too without loosing a single bit of data.
Now I am researching on OSX86 and will try to improve my graphics and sound in it. Internet and 1024x768 resoultion are working fine it right now and it's really nice operating system.
Wish you all happy diwali and enjoy OSX86 (power of MAC on Intel).
Now finally I rebooted my laptop from the hard drive and tested all my 3 Operating System. All 3 booted well.
So now I have 3 operating system on my hard drive that are tiger osx86, windows xp home and Suse Linux 10.1 and that too without loosing a single bit of data.
Now I am researching on OSX86 and will try to improve my graphics and sound in it. Internet and 1024x768 resoultion are working fine it right now and it's really nice operating system.
Wish you all happy diwali and enjoy OSX86 (power of MAC on Intel).
Hardware:
Lenovo Laptop 3000N100 (07684KA)
512 DDR2 SDRAM (667 Mhz)
Intel Centrino Dual Core 1.66 Ghz
80 GB SATA Hard Drive
RealTek Ethernet
Intel Pro 10/100 Wireless
Intel 945GM Mobile Graphics
Intel High Definition Audio (SoundMAX)
Integrated Camera
DVD RAM
PCMCIA
Card Reader
4 USB
TV OUT
External Monitor Port
Firewire Device
15.4” inch Wide Screen
Finger Print Scanner
Bluetooth Enabled
Wednesday, May 24, 2006
Installing Windows XP virtual Machine

In the previous post we discussed how we can install and configure VMware-workstation on a Fedora Core 5 machine. Now in this post I am going to discuss with you how to install a Windows XP virtual machine inside the VMware-workstation we installed in the previous post.
From inside the VMware Application Select File->New->Virtual Machine.
A "New Virtual Machine Wizard" gets opened up, inside the wizard you are asked various questions you need to follow these simple steps in-order to install a simple Windows XP Professional Virtual Machine.
Step 1) Just Press Next
Step 2) Virtual Machine Configuration -> Select Custom and Press Next
Step 3) New Virtual Machine Format -> Select New-Workstation 5
Step 4) Guest Operating System -> Select (1) Microsoft Windows and inside Version Select Windows XP Professional
Step 5) Select a Name for your virtual machine you want and the path you want to save that virtual machine to.
NOTE: Whichever path you give mind you that it should be having at-least 4GB free space of HardDisk.
Step 6) Number of Processors: One
Step 7) Memory Size : It depends on how much RAM do you have, as I have only 256 MB RAM I give 128 MB range if you have 512 MB RAM I recommend you go for 256 MB RAM size here. Just slide the slider towards left or right to change the memory size.
Step 8) Network Type: If you have a broadband connection and you want that connection to be accessed inside windows virtual machine select "Bridge Networking" , if you want to only communicate with the Fedora Core 5 host machine select "Host Only Networking" and if you don't want any network connection select "No Network Connection".
Step 9) SCSI Adapter: Select BusLogic and Press Next (LSI logic seems to have problem with windows XP drivers set).
Step 10) Disk: Select "Create New Virtual Disk" and Press Next
Step 11) Virtual Disk Type: IDE (Recommended) Select this and Press Next
Step 12) Disk Size: I gave a 4GB space for my Windows XP virtual Machine here and selected "split disk into 2 GB files". It depends on your needs. If you want to allocate more disk space you can give more space.
NOTE: The option "Allocate all disk space now" option will allocate all the said disk space during that time and in that case you should have the specified disk space where your virtual machine is going to be saved.
Step 13) Disk file Name: Choose the name and the location. I prefered the default one and Press Next.
After these steps the wizard finishes up the new virtual machine gets created and it's time to boot up into the new virtual machine.
Now it's time to install Windows XP Professional:
Step 1) So just put inside the Windows XP Setup CD inside the CD-Drive and "Power On" the virtual machine.
Step 2) During the boot up click inside the "Black Screen" (to come out of the screen press Ctrl+Alt) and press "Esc" key to get inside the "BIOS setup". Here select the First Boot Option as CD-ROM, save the setting and exit.
Step 3) After the windows XP installation starts and everything goes as it goes when you install Windows XP.
Step 4) Just during the partition time you will be shown a Single Parition as Free Space. Create a FAT/NTFS partition of that and install windows XP on that parition.
Voila ! You now have a Fedora Core 5 Machine inside which you have a running Windows XP.
Here I am posting a Screenshot I took when I was installing Windows XP inside my Fedora Core 5 (using vmware).
From inside the VMware Application Select File->New->Virtual Machine.
A "New Virtual Machine Wizard" gets opened up, inside the wizard you are asked various questions you need to follow these simple steps in-order to install a simple Windows XP Professional Virtual Machine.
Step 1) Just Press Next
Step 2) Virtual Machine Configuration -> Select Custom and Press Next
Step 3) New Virtual Machine Format -> Select New-Workstation 5
Step 4) Guest Operating System -> Select (1) Microsoft Windows and inside Version Select Windows XP Professional
Step 5) Select a Name for your virtual machine you want and the path you want to save that virtual machine to.
NOTE: Whichever path you give mind you that it should be having at-least 4GB free space of HardDisk.
Step 6) Number of Processors: One
Step 7) Memory Size : It depends on how much RAM do you have, as I have only 256 MB RAM I give 128 MB range if you have 512 MB RAM I recommend you go for 256 MB RAM size here. Just slide the slider towards left or right to change the memory size.
Step 8) Network Type: If you have a broadband connection and you want that connection to be accessed inside windows virtual machine select "Bridge Networking" , if you want to only communicate with the Fedora Core 5 host machine select "Host Only Networking" and if you don't want any network connection select "No Network Connection".
Step 9) SCSI Adapter: Select BusLogic and Press Next (LSI logic seems to have problem with windows XP drivers set).
Step 10) Disk: Select "Create New Virtual Disk" and Press Next
Step 11) Virtual Disk Type: IDE (Recommended) Select this and Press Next
Step 12) Disk Size: I gave a 4GB space for my Windows XP virtual Machine here and selected "split disk into 2 GB files". It depends on your needs. If you want to allocate more disk space you can give more space.
NOTE: The option "Allocate all disk space now" option will allocate all the said disk space during that time and in that case you should have the specified disk space where your virtual machine is going to be saved.
Step 13) Disk file Name: Choose the name and the location. I prefered the default one and Press Next.
After these steps the wizard finishes up the new virtual machine gets created and it's time to boot up into the new virtual machine.
Now it's time to install Windows XP Professional:
Step 1) So just put inside the Windows XP Setup CD inside the CD-Drive and "Power On" the virtual machine.
Step 2) During the boot up click inside the "Black Screen" (to come out of the screen press Ctrl+Alt) and press "Esc" key to get inside the "BIOS setup". Here select the First Boot Option as CD-ROM, save the setting and exit.
Step 3) After the windows XP installation starts and everything goes as it goes when you install Windows XP.
Step 4) Just during the partition time you will be shown a Single Parition as Free Space. Create a FAT/NTFS partition of that and install windows XP on that parition.
Voila ! You now have a Fedora Core 5 Machine inside which you have a running Windows XP.
Here I am posting a Screenshot I took when I was installing Windows XP inside my Fedora Core 5 (using vmware).
VMware Installation , Configuration on Fedora Core 5
In this post , I am going to share my experiences with you all , of how was I able to install VMware 5.5.1 on Linux (Fedora Core 5) and configure it and finally install windows XP through it.
So following the step-by-step procedure we start up right away(follow all the below steps by login via root user only):
Step 1) Vmware needs that the kernel and it's appropriate sources are installed properly on your system. I recommend you to install the latest kernel for Fedora core 5. You can do this by issuing the following simple commands (note that you need to be connected to internet as a root user in order for these commands to run successfully):
a) yum install kernel
b) yum install kernel-devel
This will install the latest kernel and it's source code. The version I have is 2.6.16-1.2080_FC5. After you do this step you need to reboot and boot into the newly installed kernel.
Step 2) We need the VMware Software for Fedora Core 5. For this we can go here and follow the steps described there. Download the RPM file for VMware 5.5.1-19175 version.
Step 3) As the above software is a shareware version you get a key for the first 30 days trial on the e-mail provided by you during registration on the link provided in step (2), note down the key and save it somewhere in a text file we will need it after installation and configuration finishes up.
Step 4) Now as VMware 5.5.1 has reported some problem during the configuration in Fedora Core 5 we will need to download this specially created perl script from here.
Step 5) Install VMware from the rpm by issuing the following command:
rpm -ivh VMware-workstation-5.5.1-19175.i386.rpm
Step 6) After installing the above rpm we need to extract the script downloaded in step (4) and follow these steps:
a) gzip -d vmware-any-any-update101.tar.gz
b) tar -xf vmware-any-any-update101.tar
c) cd vmware-any-any-update101
d) ./runme.pl
Step 6) After you run the runme perl script it will ask you many things. These should be your answers:
Question 1) Before running VMware for the first time after update, you need to configure it for your running kernel by invoking the following command:
"/usr/bin/vmware-config.pl". Do you want this script to invoke the command for
you now? [yes]
Answer 1) Press Enter
Then Read the License Agreement (press Space Bar 7-8 times) and in the end type yes and press Enter.
Question 2) In which directory do you want to install the mime type icons?
[/usr/share/icons]
Answer 2) Press Enter
Question 3) What directory contains your desktop menu entry files? These files have a
.desktop file extension. [/usr/share/applications]
Answer 3) Press Enter
Question 4) In which directory do you want to install the application's icon?
[/usr/share/pixmaps]
Answer 4) Press Enter
Question 5) None of the pre-built vmmon modules for VMware Workstation is suitable for your running kernel. Do you want this program to try to build the vmmon module for your system (you need to have a C compiler installed on your system)? [yes]
Answer 5) Press Enter
Question 6) What is the location of the directory of C header files that match your running kernel? [/lib/modules/2.6.16-1.2080_FC5/build/include]
Answer 6) Yes (note your directory listing may differ with the given here !)
Question 7) Do you want networking for your virtual machines? (yes/no/help) [yes]
Answer 7) Press Enter (if you don't want networking type no and press enter). If you need to run internet from your virtual machine in future and you happen to use a broadband connection please select yes and press enter.
Question 8) Do you want to be able to use NAT networking in your virtual machines? (yes/no) [yes]
Answer 8) This depends. For my setting I typed no and Pressed Enter.
Question 9) Do you want to be able to use host-only networking in your virtual machines?[no]
Answer 9) Answer it yes or no if you want/don't want to communicate with your Fedora Core 5 host machine inside the virtual machine you install later. I choosed no.
Step 7) After these simple questions and configuration of VMware-5.5.1 finishes off and now we can run the vmware software by issuing the following command at command line:
vmware
Step 8) Once the software starts up goto Help->Enter Serial Number ... and paste the serial number you got via email during step (3).
And voila! VMware is now installed and configured on your fedora core 5 machine.
In the next post I am going to explain you how did I configured the Windows XP Professional Virtual Machine inside VMware and that too through the step by step guide. So for the time being just play around with the above guide and try your hands with the different options giving in the software.
Happy Linux'ing !!
So following the step-by-step procedure we start up right away(follow all the below steps by login via root user only):
Step 1) Vmware needs that the kernel and it's appropriate sources are installed properly on your system. I recommend you to install the latest kernel for Fedora core 5. You can do this by issuing the following simple commands (note that you need to be connected to internet as a root user in order for these commands to run successfully):
a) yum install kernel
b) yum install kernel-devel
This will install the latest kernel and it's source code. The version I have is 2.6.16-1.2080_FC5. After you do this step you need to reboot and boot into the newly installed kernel.
Step 2) We need the VMware Software for Fedora Core 5. For this we can go here and follow the steps described there. Download the RPM file for VMware 5.5.1-19175 version.
Step 3) As the above software is a shareware version you get a key for the first 30 days trial on the e-mail provided by you during registration on the link provided in step (2), note down the key and save it somewhere in a text file we will need it after installation and configuration finishes up.
Step 4) Now as VMware 5.5.1 has reported some problem during the configuration in Fedora Core 5 we will need to download this specially created perl script from here.
Step 5) Install VMware from the rpm by issuing the following command:
rpm -ivh VMware-workstation-5.5.1-19175.i386.rpm
Step 6) After installing the above rpm we need to extract the script downloaded in step (4) and follow these steps:
a) gzip -d vmware-any-any-update101.tar.gz
b) tar -xf vmware-any-any-update101.tar
c) cd vmware-any-any-update101
d) ./runme.pl
Step 6) After you run the runme perl script it will ask you many things. These should be your answers:
Question 1) Before running VMware for the first time after update, you need to configure it for your running kernel by invoking the following command:
"/usr/bin/vmware-config.pl". Do you want this script to invoke the command for
you now? [yes]
Answer 1) Press Enter
Then Read the License Agreement (press Space Bar 7-8 times) and in the end type yes and press Enter.
Question 2) In which directory do you want to install the mime type icons?
[/usr/share/icons]
Answer 2) Press Enter
Question 3) What directory contains your desktop menu entry files? These files have a
.desktop file extension. [/usr/share/applications]
Answer 3) Press Enter
Question 4) In which directory do you want to install the application's icon?
[/usr/share/pixmaps]
Answer 4) Press Enter
Question 5) None of the pre-built vmmon modules for VMware Workstation is suitable for your running kernel. Do you want this program to try to build the vmmon module for your system (you need to have a C compiler installed on your system)? [yes]
Answer 5) Press Enter
Question 6) What is the location of the directory of C header files that match your running kernel? [/lib/modules/2.6.16-1.2080_FC5/build/include]
Answer 6) Yes (note your directory listing may differ with the given here !)
Question 7) Do you want networking for your virtual machines? (yes/no/help) [yes]
Answer 7) Press Enter (if you don't want networking type no and press enter). If you need to run internet from your virtual machine in future and you happen to use a broadband connection please select yes and press enter.
Question 8) Do you want to be able to use NAT networking in your virtual machines? (yes/no) [yes]
Answer 8) This depends. For my setting I typed no and Pressed Enter.
Question 9) Do you want to be able to use host-only networking in your virtual machines?[no]
Answer 9) Answer it yes or no if you want/don't want to communicate with your Fedora Core 5 host machine inside the virtual machine you install later. I choosed no.
Step 7) After these simple questions and configuration of VMware-5.5.1 finishes off and now we can run the vmware software by issuing the following command at command line:
vmware
Step 8) Once the software starts up goto Help->Enter Serial Number ... and paste the serial number you got via email during step (3).
And voila! VMware is now installed and configured on your fedora core 5 machine.
In the next post I am going to explain you how did I configured the Windows XP Professional Virtual Machine inside VMware and that too through the step by step guide. So for the time being just play around with the above guide and try your hands with the different options giving in the software.
Happy Linux'ing !!
Saturday, April 22, 2006
BSNL Broadband configuration Linux
I was seeing constant threads at orkut regarding configuration of internet on linux. This guide I hope will help you establish the BSNL broadband connection on your linux box. I assume that you have configured your network interface (if not then I am going to post a similar post regarding howto configure it).
This document is a copy of a document which I saw in late 2004 when I was searching for a howto to configure internet in linux.
This document describes howto setup bsnl broadband service on your gnu/linux server/desktop. It assumes that you are neither linux beginer nor an expert. It assumes that you are aware of basic gnu/linux commands.
I have installed it on redhat 9. I dont find any reason why it would not work on following distributions:
- FC1
- FC2
- FC3
- FC4
- FC5
Pre-Requisites
- Please ensure that you have connected a working ethernet card which is supported on gnu/linux. Test the ethernet card & ensure that it is working.
- Root access to a gnu/linux box
Before we start, please ensure that you have the following details on hand:
- BSNL Broadband connection -:)
- Username & Password
Using the builtin dialer
A HOWTO with instructions on using the PPPoE builtin dialer of the Huawei SmartAX MT800 ADSL router is available.
The procedure to configure the dialer in UTStarCom UT300R modem is given here
The procedure to configure the dialer in UTStarCom UT300R modem is given here
Using RP-PPPOE as dialer
Installation
- As BSNL broadband is using rp-pppoe (Roaring Penguin - Point to Point Over Ethernet), we would be required to download & install this package. This package is normally available on most of the distributions. But, if you are using redhat7.3, please download the following packages:
If you are downloading the tar.gz version, you have to build the rpm first. So, please walk through the following procedure to build the rpm:
Procedure to build RPM from tar.gz.
 1. Login as root
2. Download tar.gz version & execute the following commands
# tar -zxvf rp-pppoe-3.5.tar.gz (untar this package)
 * This command would untar the package in the current directory.
# cp rp-pppoe-3.5.tar.gz /usr/src/redhat/SOURCES/
# cd rp-pppoe-3.5
 * The rpm spec file, rp-pppoe.spec is available in this directory.
# cp rp-pppoe.spec /usr/src/redhat/SPECS/
# cd /usr/src/redhat/SPECS
# rpm -ba rp-pppoe.spec
*  The  above  command would untar the tar.gz package in ../BUILD
directory, compile the package and finally it would create neces
sary rpms in
If everything goes fine, you would see the following or similar message:
 Wrote: /usr/src/redhat/SRPMS/rp-pppoe-3.5-1.src.rpm
Wrote: /usr/src/redhat/RPMS/i386/rp-pppoe-3.5-1.i386.rpm
Wrote: /usr/src/redhat/RPMS/i386/rp-pppoe-gui-3.5-1.i386.rpm
Executing(%clean): /bin/sh -e /var/tmp/rpm-tmp.97349
+ umask 022
+ cd /usr/src/redhat/BUILD
+ cd rp-pppoe-3.5
+ rm -rf /tmp/pppoe-build
+ exit 0
If this is the case, the necessary rpms are successfully created and they are available in appropriate directory.
 Source RPMS - /usr/src/redhat/SRPMS/rp-pppoe-3.5-1.src.rpm
Binary RPMS - /usr/src/redhat/RPMS/i386/rp-pppoe-3.5-1.i386.rpm
GUI RPMS    - /usr/src/redhat/RPMS/i386/rp-pppoe-gui-3.5-1.i386.rpm
Now, at this stage you are having necessary rpms with you. Either you have downloaded them from the above website. Or you would have built them on your own:
Command Line Version
# rpm -vih rp-pppoe-3.5-1.i386.rpm
It would install the command line version of rp-pppoe package.
GUI Version
# rpm -vih rp-pppoe-gui-3.5-1.i386.rpm
It would install the gui version of rp-pppoe package. If you have successfully installed, then you can proceed to next section.
Configuration
Once you have installed rp-pppoe package, all necessary commands would have been installed.
 adsl-setup  - to configure the connection parameters
adsl-start  - to start the connection
adsl-status - to check status of the connection
adsl-stop   - to stop the connection
Now, we are ready to configure the BSNL broadband internet connection.
Here you have to configure the following parameters:
 * userid
* network interface (eth0 or ..)
* Demand value (normally you can leave it blank)
* DNS Information (primary & secondary)
- With regard to primary & secondary dns, You can leave it blank, as it would be taken care automatically. If you wish to know the dns details, just complete this wizard and when you run adsl-start, do:
 # tail -f /var/log/messages


Mar 15 15:29:48 Gateway pppd[3564]: Remote message: Authentication success,Welcome!
Mar 15 15:29:48 Gateway pppd[3564]: local  IP address 59.92.9.154
Mar 15 15:29:48 Gateway pppd[3564]: remote IP address 59.92.8.1
Mar 15 15:29:48 Gateway pppd[3564]: primary   DNS address 61.1.96.69
Mar 15 15:29:48 Gateway pppd[3564]: secondary DNS address 61.1.96.71
There it goes! The primary & secondary dns details are found and it would be automatically updated in /etc/resolv.conf.
- Then you should enter the following details:
 * Password
* Firewall (set is to 2, MASQUERADE)
* Confirm
- The following is the screen shot of adsl-setup command.
 # adsl-setup
Welcome to the Roaring Penguin ADSL client setup.  First, I will run
some checks on your system to make sure the PPPoE client is installed
properly...

Looks good!  Now, please enter some information:

USER NAME

>>> Enter your PPPoE user name (default test@dataone):

INTERFACE

>>> Enter the Ethernet interface connected to the ADSL modem
For Solaris, this is likely to be something like /dev/hme0.
For Linux, it will be ethn, where 'n' is a number.
(default eth0):

Do you want the link to come up on demand, or stay up continuously?
If you want it to come up on demand, enter the idle time in seconds
after which the link should be dropped.  If you want the link to
stay up permanently, enter 'no' (two letters, lower-case.)
NOTE: Demand-activated links do not interact well with dynamic IP
addresses.  You may have some problems with demand-activated links.
>>> Enter the demand value (default no):

DNS

Please enter the IP address of your ISP's primary DNS server.
If your ISP claims that 'the server will provide DNS addresses',
enter 'server' (all lower-case) here.
If you just press enter, I will assume you know what you are
doing and not modify your DNS setup.
>>> Enter the DNS information here: 61.1.128.5
Please enter the IP address of your ISP's secondary DNS server.
If you just press enter, I will assume there is only one DNS server.
>>> Enter the secondary DNS server address here: 61.0.0.5

PASSWORD

>>> Please enter your PPPoE password:
>>> Please re-enter your PPPoE password:

FIREWALLING

Please choose the firewall rules to use.  Note that these rules are
very basic.  You are strongly encouraged to use a more sophisticated
firewall setup; however, these will provide basic security.  If you
are running any servers on your machine, you must choose 'NONE' and
set up firewalling yourself.  Otherwise, the firewall rules will deny
access to all standard servers like Web, e-mail, ftp, etc.  If you
are using SSH, the rules will block outgoing SSH connections which
allocate a privileged source port.

The firewall choices are:
0 - NONE: This script will not set any firewall rules.  You are responsible
        for ensuring the security of your machine.  You are STRONGLY
        recommended to use some kind of firewall rules.
1 - STANDALONE: Appropriate for a basic stand-alone web-surfing workstation
2 - MASQUERADE: Appropriate for a machine acting as an Internet gateway
              for a LAN
>>> Choose a type of firewall (0-2): 2

** Summary of what you entered **

Ethernet Interface: eth0
User name:          test@dataone
Activate-on-demand: No
Primary DNS:        61.1.128.5
Secondary DNS:      61.0.0.5
Firewalling:        MASQUERADE

>>> Accept these settings and adjust configuration files (y/n)? y
Adjusting /etc/ppp/pppoe.conf
Adjusting /etc/resolv.conf
(But first backing it up to /etc/resolv.conf-bak)
Adjusting /etc/ppp/pap-secrets and /etc/ppp/chap-secrets
(But first backing it up to /etc/ppp/pap-secrets-bak)
(But first backing it up to /etc/ppp/chap-secrets-bak)


Congratulations, it should be all set up!

Type 'adsl-start' to bring up your ADSL link and 'adsl-stop' to bring
it down.  Type 'adsl-status' to see the link status.
Internet Connection
Now, if you see this Congrats! message, then you are all set & done. You can type,
# adsl-start ..Connected! #Thats it. The bsnl broadband setup has been installed & configured.
At this point, you can go through the man pages of appropriate adsl-* commands for details.
Hope this article helps you out in configuring internet on linux specially for the redhat persons. I will soon post a article regarding configuring network interfaces on linux and other stuff related to it.
Wednesday, April 19, 2006
Stepper motor driver GNU/Linux 2.6 kernel
I started a work on some project related to Stepper Motor Driver in Linux. I found one tutorial at linux gazette online magazine. But to my surprise the driver written was for 2.4.x kernel's. I soon realised that I need to do pretty much stuff in order to make that driver work in 2.6.x kernel. Then again to my surprise I found a excellent tutorial at tldp explaining the 2.6.x and 2.4.x kernel module programming. I went through those tutorials and I ported the driver for 2.6.x kernel.
I used a debian 3.1 sarge with 2.6.8 kernel in it. I started off with some basic differences (between 2.4.x and 2.6.x). Code writing convention has change alot and these days module programmer prefer to use macro's more than anything. They even have macros for defining the init function and the exit function. I went on to learn those things and finally came up with a code which I suppose will work in most of the 2.6.x's series.
Here I present the code:
#include "linux/kernel.h"
#include "linux/fs.h"
#include "linux/module.h"
#include "linux/init.h"
#include "asm/io.h"
#include "asm/uaccess.h"
#define LPT_BASE 0x378
#define DEVICE_NAME "Stepper"
#define DRIVER_DESC "*Stepper Motor Driver*"
static int Major;
static int Device_Open=0;
static int i,j,k=0;
static int pattern[2][4][8] = {
{{0xA,0x9,0x5,0x6,0xA,0x9,0x5,0x6},{0xA,0x8,0x9,0x1,0x5,0x4,0x6,0x2}},
{{0x6,0x5,0x9,0xA,0x6,0x5,0x9,0xA},{0x2,0x6,0x4,0x5,0x1,0x9,0x8,0xA}}
};
void step(void)
{
if(k<8)
{
printk(KERN_INFO "%d\n",pattern[i][j][k]);
outb(pattern[i][j][k],LPT_BASE);
k++;
}
else
{
k=0;
printk(KERN_INFO "%d\n",pattern[i][j][k]);
outb(pattern[i][j][k],LPT_BASE);
k++;
}
}
static int stepper_open(struct inode *inode, struct file *file)
{
printk(KERN_INFO "Stepper Opened\n");
if(Device_Open)
return -EBUSY;
Device_Open++;
try_module_get(THIS_MODULE);
return 0;
}
static int stepper_release(struct inode *inode, struct file *file)
{
printk(KERN_INFO "Stepper Released\n");
Device_Open --;
module_put(THIS_MODULE);
return 0;
}
static ssize_t stepper_write(struct file *file, const char *buffer, size_t len, loff_t *off)
{
char data;
get_user(data,buffer);
switch (data)
{
case 'h': /* Half Step */
printk(KERN_INFO "Half-Step mode initialized\n");
j=0;
break;
case 'f': /* Full Step */
printk(KERN_INFO "Full-Step mode initialized\n");
j=1;
break;
case 'F': /* Forward */
i=0;
step();
break;
case 'R': /* Reverse */
i=1;
step();
break;
default: /* Invalid */
printk(KERN_INFO "Invalid argument\n");
break;
}
return -EINVAL;
}
struct file_operations fops = {
.write=stepper_write,
.open=stepper_open,
.release=stepper_release
};
static int __init entry(void)
{
Major=register_chrdev(0,DEVICE_NAME,&fops);
if(Major < 0)
{
printk(KERN_INFO "Cannot get major number for the device %s\n",DEVICE_NAME);
return Major;
}
printk(KERN_INFO "'mknod /dev/%s c %d 0'\n",DEVICE_NAME,Major);
return 0;
}
static void __exit bye(void)
{
int ret = unregister_chrdev(Major, DEVICE_NAME);
if (ret < 0)
printk(KERN_INFO "Error in un-registering stepper: %d\n", ret);
else
printk(KERN_INFO "Stepper un-registered.\n");
}
module_init(entry);
module_exit(bye);
MODULE_LICENSE("GPL");
MODULE_DESCRIPTION(DRIVER_DESC);
MODULE_SUPPORTED_DEVICE(DEVICE_NAME);
The messages logged by this driver can be found in /var/log/messages file. Anytime we need to see what the program does or what it outputs we need to open the file and go down the file to see the recent outputs. This can be made easy by issuing the following command:
tail -f /var/log/messages
As a super user now we need to execute the below command on the terminal. Here the major number is the number allocated by the kernel when the module get's inserted into it. It's a dynamic number. Minor number is mostly 0 (in this case).
In my case I had to execute the following command:
mknod /dev/Stepper c 254 0
This create's a device file in the /dev directory and now if we want to communicate to the motor all we need to do is write data onto this file. That can be done by simply using:
echo "h" > /dev/Stepper
echo "F" > /dev/Stepper
(NOTE: What's happening when these commands execute can be see by tail -f /var/log/messages)
Here data to the stepper device is any valid character in the set {h,f,F,R}. First two elements of the set intializes the motor in half-step or full-step mode and the last two data set actually runs the motor in Forward or Reverse directions.
In the next article I will explain the user interface program I created to handle this motor. I used the power of GTK+ in creating that interface.
Note:
There maybe many points I have left in this article regarding the internal working of the program. For that I assume you have gone through the page .
I used a debian 3.1 sarge with 2.6.8 kernel in it. I started off with some basic differences (between 2.4.x and 2.6.x). Code writing convention has change alot and these days module programmer prefer to use macro's more than anything. They even have macros for defining the init function and the exit function. I went on to learn those things and finally came up with a code which I suppose will work in most of the 2.6.x's series.
Here I present the code:
#include "linux/fs.h"
#include "linux/module.h"
#include "linux/init.h"
#include "asm/io.h"
#include "asm/uaccess.h"
#define LPT_BASE 0x378
#define DEVICE_NAME "Stepper"
#define DRIVER_DESC "*Stepper Motor Driver*"
static int Major;
static int Device_Open=0;
static int i,j,k=0;
static int pattern[2][4][8] = {
{{0xA,0x9,0x5,0x6,0xA,0x9,0x5,0x6},{0xA,0x8,0x9,0x1,0x5,0x4,0x6,0x2}},
{{0x6,0x5,0x9,0xA,0x6,0x5,0x9,0xA},{0x2,0x6,0x4,0x5,0x1,0x9,0x8,0xA}}
};
void step(void)
{
if(k<8)
{
printk(KERN_INFO "%d\n",pattern[i][j][k]);
outb(pattern[i][j][k],LPT_BASE);
k++;
}
else
{
k=0;
printk(KERN_INFO "%d\n",pattern[i][j][k]);
outb(pattern[i][j][k],LPT_BASE);
k++;
}
}
static int stepper_open(struct inode *inode, struct file *file)
{
printk(KERN_INFO "Stepper Opened\n");
if(Device_Open)
return -EBUSY;
Device_Open++;
try_module_get(THIS_MODULE);
return 0;
}
static int stepper_release(struct inode *inode, struct file *file)
{
printk(KERN_INFO "Stepper Released\n");
Device_Open --;
module_put(THIS_MODULE);
return 0;
}
static ssize_t stepper_write(struct file *file, const char *buffer, size_t len, loff_t *off)
{
char data;
get_user(data,buffer);
switch (data)
{
case 'h': /* Half Step */
printk(KERN_INFO "Half-Step mode initialized\n");
j=0;
break;
case 'f': /* Full Step */
printk(KERN_INFO "Full-Step mode initialized\n");
j=1;
break;
case 'F': /* Forward */
i=0;
step();
break;
case 'R': /* Reverse */
i=1;
step();
break;
default: /* Invalid */
printk(KERN_INFO "Invalid argument\n");
break;
}
return -EINVAL;
}
struct file_operations fops = {
.write=stepper_write,
.open=stepper_open,
.release=stepper_release
};
static int __init entry(void)
{
Major=register_chrdev(0,DEVICE_NAME,&fops);
if(Major < 0)
{
printk(KERN_INFO "Cannot get major number for the device %s\n",DEVICE_NAME);
return Major;
}
printk(KERN_INFO "'mknod /dev/%s c %d 0'\n",DEVICE_NAME,Major);
return 0;
}
static void __exit bye(void)
{
int ret = unregister_chrdev(Major, DEVICE_NAME);
if (ret < 0)
printk(KERN_INFO "Error in un-registering stepper: %d\n", ret);
else
printk(KERN_INFO "Stepper un-registered.\n");
}
module_init(entry);
module_exit(bye);
MODULE_LICENSE("GPL");
MODULE_DESCRIPTION(DRIVER_DESC);
MODULE_SUPPORTED_DEVICE(DEVICE_NAME);
The messages logged by this driver can be found in /var/log/messages file. Anytime we need to see what the program does or what it outputs we need to open the file and go down the file to see the recent outputs. This can be made easy by issuing the following command:
tail -f /var/log/messages
As a super user now we need to execute the below command on the terminal. Here the major number is the number allocated by the kernel when the module get's inserted into it. It's a dynamic number. Minor number is mostly 0 (in this case).
In my case I had to execute the following command:
mknod /dev/Stepper c 254 0
This create's a device file in the /dev directory and now if we want to communicate to the motor all we need to do is write data onto this file. That can be done by simply using:
echo "h" > /dev/Stepper
echo "F" > /dev/Stepper
(NOTE: What's happening when these commands execute can be see by tail -f /var/log/messages)
Here data to the stepper device is any valid character in the set {h,f,F,R}. First two elements of the set intializes the motor in half-step or full-step mode and the last two data set actually runs the motor in Forward or Reverse directions.
In the next article I will explain the user interface program I created to handle this motor. I used the power of GTK+ in creating that interface.
Note:
There maybe many points I have left in this article regarding the internal working of the program. For that I assume you have gone through the page .
Monday, November 14, 2005
How tough is the RHCE exam ?
Toughness of a certification exam can be judged out through many parameters. But important among them is the course content, type of examination (practical or theory) and also the industry value of the certificate.
As I am currently studying RHCE I created this blog to get the views of students/sysadmin taking the RHCE exam or who had given the exam earlier. What are your views about the exam and it's toughness for a newbie to Linux operating system.
Please let your view been expressed and communicate them with other RHCE aspirants.
Thanks
As I am currently studying RHCE I created this blog to get the views of students/sysadmin taking the RHCE exam or who had given the exam earlier. What are your views about the exam and it's toughness for a newbie to Linux operating system.
Please let your view been expressed and communicate them with other RHCE aspirants.
Thanks
Subscribe to:
Posts (Atom)


 Posts
Posts

